Thursday, September 30, 2010

Sophisticated Halloween Card


I created this sophisticated Halloween card for my MIL.
I used my brand new Tim Holtz pumpkin fade and emboss the SU cardstock. Inked and added bakers twine and some beads.

Stamp is Studio G.

Entering this in Cardz TV - Halloween card without using our Cricut.

Wednesday, September 29, 2010

Blog Candy HERE for 200 followers


Hello all,
To all my faithful followers new and old place a comment here for chance to win.
If you are not a follower - please join in on my blog and follow and comment here.
Here is what candy I have to offer.
I will be pulling the commenter sometime Friday night, so comment here and come back on Friday to see who I pulled.

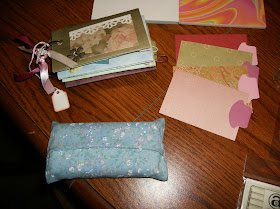
A handmade paper towel tube mini album that have 4 pull tabs inserts for journaling or photos
My recent newly made Travel Pocket Tissue holder with tissues for your purse or craft bag (hope you like the blue fabric)

Three clear acrylic stamps one is Studio G two are Ali Edwards

A pack of 4 1/2" x 6 1/2" cardstock and paper mats
A package of rubberstamps

Saturday, September 25, 2010

Fabric Pocket Tissue Covers Holders


I saw this on a blog and I wrote the directions down yesterday and I lost them today!
But the gist of it is I took a 7 x 7" piece of fabric (x2) and sewed them right sides together. Left an inch or so opening to allow for turning right side out.
Steam press the piece so all sides are nice and flat.
Tri Fold so the outer side is seen and pin the sides. (I used the same fabric inside and out on the ones below).
Sew up the sides paying attention to reverse stitch the whole way to give it more strength.
Turn right side out and insert the pack of pocket tissues. I was able to make 6 in an hour!
These are Christmas gifts and I will be making more to give out too.

Note: the top one I used satin fabric inside and did not overlap the opening as I did in the blue and purple ones.

Friday, September 24, 2010

Crisp Autumn


After a long work week I couldn't wait to go through my Google Reader and look at all your postings. After a few hours - I finally settled down to make this card tonight.
This card will be entered is a few challenges
Orange Brown and green at ACLP
Cute card as well at Anything Challenge
Charisma Cardz - anything goes
Stitching at Crafty Catz - my first real stitching on a card!!
Crafty Creations - falling leaves (I used my little Marvy Uchida punch love it for my fall cards.
Sketch from Cute Card Thursday
Use a critter at Paper Cutz Challenge (use the squirrel from Create a Critter cart)
Theme Autumn from Paper Playtime
Polly Craft Mondays wanted Cute and Cuddly

Inside I used a portion of the fall word Cuttlebug Folder

Wednesday, September 22, 2010

Almost at 200

I'll be posting blog candy soon - almost at 200 followers.

Thank you everyone and please leave comments - only way for me to find you and visit too!

Sunday, September 19, 2010

OWH Challenge #7 love


To help me complete this challenge at OWH fb challenge #7 I used the layout from Card Patterns

Image from SU!, embossing powder from Inkadinkado, ribbon from Target, patten paper from Provo Craft, I embossed the background with the Sizzix paisley folder.

Holiday Season - sentiment focal point


At OWH and Bah Humbug! the card had to have the sentiment as the focal point.

I bought this stamp a long long time ago (it's by Inkadinkado) and with it being so large - it fits perfect on an A2 card.

Layers and foam mounted it for height.
Add a couple rows of satin ribbon and little rhinestone for bling.

OWH Ch#5 6-8:00PM Bling it Up!


Well this was a challenge for me - at OWH fb page the next challenge is Bling it Up!
I use some awesome prismic (sp?) cardstock I bought a Target and punched one out usign a large MS border punch.
Added some gems to the center of the scallop flowers and stamped the swirls and sentiment using SU ink. Added pearls to the sentiment and raised it up using foam squares.

The camera does strange thing due to the prism paper.

FB Birthday Bash! Challenge #4: baby-child card


At OWH fb page - this hour challenge is to create a child's card that one would write home a letter to a wee one. To save for years to come.
Background embossed with Swiss Dots, border punch is from Martha Stewart, sentiment from Unity Stamp - and the baby rubber stamp is from Marabel

FB Birthday Bash! Challenge #2: Indian Summer


Well I missed the timing on Ch#2 but I wanted to partake in it anways.
On fb page of OWH - not wanting summer to end - we were asked to make a Indian Summer card.
Here is my take - using SU! stamps, ink and paper. The leaf punch is from Marvy Uchida

OWH S&S sketch 35 Ch#3 2-4:00PM


(Inside)
I made this card for the OWH S&S fb 2-4:00 PM EST challenge
Paper from HOTP, image from Stampendous border punch from EK Success

Autumn banner


Made this for my daughter, this completes the season banners for her.
Here is how I made it - I cut 4 x 4 pieces of cardboard from a USPS box I got in the mail.
Punched the holes in the pieces with my crop-a-dial.
Inked all the edges then proceeded to look at my carts for autumn items.
The font I cut the regular and shadow at 1 1/2" from Storybook (Thank you Audrey) and put that aside.
The elements were cut from the following:
A - The apples were cut from Doodlecharms at 2 1/4 and 1 3/4" page 118 key #37
U - The basket was cut from Doodlecharms at 2 1/4" Key #35
T - the leaves were cut from Doodlecharms at 1 1/2" key #34
U - the Pumpkins were cut from A Child's Year page 52
M - The ghost was cut from Paper Doll Dress Up at 1 1/2" 2 3/4", and 3" and the spiders were cut from Designer Calendar page 48 at 1 1/4" and 1 3/4"
N - The turkey was cut from Designer Calendar as well as the Pilgrim hat pg 38

Entering this at Paper Playtime autumn challenge - I just love this time of year here in New England!
oh -and to help me find some icons that I was not sure which page or cart they were on I used. What a big help. You should try it.
Generated image

Saturday, September 18, 2010

Beauty is God's handwriting


I was inspired by a card on the OWH Stars and Stamp blog. The artist masked off and allowed a circle to show through to ink and construct a sun. You do this by punching a circle from a scrap piece of card stock and then use that to mask off the rest of your card. Add ink into the circle (I used orange and yellow) with a sponge. Then I stamp the butterfly (SU!) on the card very close to the sun. Now I needed to mask off the butterfly so I could double stamp the leaves. What you do is stamp the butterfly on a thin sheet of printer paper. Cut it out very close to the inked image - add removable adhesive to this cut out buttefly and put it on top of your stamp one on the main card. Now take the leave stamp and stamp over it. When done - remove the "fake out" mask and the leaves will be BEHIND the butterfly. This is how you can create a scene. Then I just save the mask to be used at a later time.

Sentiment and leaves and butterfly were all from a retired set I bought off my Stampin' Up demo called "God's Beauty".

On the red base - it's hard to see but I added little gold i-ching (Chinese) coins. Entering this in the OWH blog as well as Anything Goes Challenge.

Moving the mail


Entering this card in the move it challenge at Simon Says
I actually have two cards to enter - but I'll list them separately as there is no comparison.

Here is a mail truck I made for my sister's co-worker celebrating a birthday. Thre's a little ol' man in the driver seat. It's a SU stamp. The mail truck is from My Community Cricut cart

I cut it out twice and mounted it so it opens at the top. I cut this rather large so all her co-workers could sign it.

Turn back - gate fold card


Another Halloween card - this time a gatefold.
I used my MS score board to score my 5 1/2 x 8 1/2 at 2 1/8 on each side.
The impressing again is the spider web Sizzix embossing plate that I sanded and cut them in 5 1/4 x 1 7/8 panels for the front of the card.
The image is another from Martha Stewart web site mounted on purple (looks blue to me in my bad lighting) and I sponged all over the card.

The inside is a Martha Stewart sentiment inked in SU Concord Crush ink. Added a tiny border of the MS Drippy Goo punch to the inside.

Eeeeeeeek!


This was a fun card - I was going through my Sizzix plates and I knew I had a spider web. So I made the impression in my white core purple cs. Sanded it and mounted on the orange A2 card base.
I printed the cat on the fence image from Martha Stewart and put a Drippy Goo border at the dop (also a MS punch).The sentiment is also from MS which was a pack of 6 sentiments last year.

Happy Birthday - handmade flower


Made this card for my MIL, I followed the basic directions from Julie but I used an embossing tool to create the arch in the petals and the lift in the center. It worked great because the embossing tool has two different tips. To assist in the pressure - just use a piece of fun foam! By used the embossing tool - you can put veins in the petals.

I am entering this in a few challenges - one at Paper Pleasing ideas, at Scrappy Frog - to make flowers, at Alphabet Challenge - we are U for unused stash - which would be my old embossing tool and the 8 petal punch. At Allsorts - we are to use three punches. I actually used 4. (Border, center flower, petals and leaves.

Here is my first sample - with diff colored paper and cs so you can see the layers.
Here is the one I made for the card - I inked to bring more hues to the flower.

The embossing on the powder blue cs is Swiss Dots by Cuttlebug, the border punch is SU! The sentiment is from my stash - I think years ago from the dollar bin at M's

To make my flowers I used the 8 petal flower by Marvy Uchida which was in my stash for a puchase a few months back that I just had to have - but not used since (LOL)
the leaves are the 5 petal flower punch from SU!