Saturday, July 31, 2010

Christmas centerpiece


Under this snowman etched jar is a paper doily and an embossed circle. Etching is really easy and once you start you will look for other things to etch.
I cut the circle with my Coluzzle and embossed it with the CB 5 x 7 snowflake folder sold exclusively by HSN. I took my white ink pad and rubbed some onto the raised areas to bring them out more.
(I moved the jar so you can see the embossing but it will sit in the actual middle.)

Inside is some butterscotch candy I picked up. Hope to put the starlight mints or maybe mini candy canes.
This is for the Cuttlebug Challenge: My challenge for you: How can you incorporate snowmen into your holiday/seasonal decor this year?

AC Moore Coupons one for two weeks


Print them and ensure you save one for the following week.

Santa's Soup


At the Cuttlebug Challenge one of the hourly challenges was Santa's Soup. It was a very cute poem. I added the contents of what is inside to one side of the tag and created my own directions for the other side.

I had been saving the Crystal Light oval containers just for the snowman soup - but this challenge for Santa's Soup fit the bill.

The Strip of paper that goes around the can is 4 7/8" x 8".
The imaged paper is from HOTP a very old 8 x 11 1/2" pp.

Christmas Card using resist embossing


I had to improvise on the Cuttlebug Challenge I did not have the large snowflake folder (I never knew there was one).
I used the cute little snowman that I embossed and then used White Pearls embossing powder.

Inside sentiment from Inkadinkado

happiness at Christmas


Created this monotone plus one color card for the Cuttlebug Challenge
I ran the base white cs through the limited 5 x 7 HSN CB snowflake folder.
Then I used my Spellbinders die and cut a couple layers one which was embossed with the same folder.
Embossed the ornament (SU) with the CB Snowy scene embossing folder and raised it on foam squares..
Sentiment and punch label also from SU
We had to use glitter on our card so I actually glittered the whole sentiment label with MS ultra fine glitter - my fav! A few other snowflakes are glittered too. Camera is hard to pick up glitter - you may click on the pics to get a better view.
I have entered this card in Winter Wonderland challenge

Paper bows


This was the first time I made a paper bow, while I have made them from ribbon, this was a challenge at the Cuttlebug Challenges.
Take a 6" x 12" double sides card stock and cut to these dimensions:
Cut eight strips at 1" X 6",
Then with the remainder 6 x 4 piece, cut one 1" x 4" strip off the top
Lastly cut four 1" X 5" strips.

I used American Crafts cs and ran the pieces through the hounds tooth CB embossing folder.
I then glued each piece using a glue dot - made it less messy and held quickly.
Take 4 of the strips (four of the 1" x 6" will make one layer) and put them together. I put them together with an eyelet instead of a brad - you'll see in the last step. You will need your Crop-A-Dial to punch them all evenly.
Take the last four of the 1" x 6" and do the same - attach them either brad or eyelet.
Then take the four 1" X 5" strips put them together.

Alternate them so the points are in opposite corners.

Now here is where I went a little different, I took a large pearl bead, and ran a thin wire through it so it would go through the last piece of card stock (1" x 4") that was eyelet together to form a loop.
I then took the wire and ran it through all the layers and twisted underneath.

Ornament Tin


I had bought a lot of these at M's (In the wedding section) for my daughter's graduation (TY take home gifts for the guests) a few years back. I had filled them with M&M's and luckily I still have plenty left. So when I came across the challenge at the Cuttlebug Challenge I was thrilled to make these. I have so many ideas now for gifts for my family.

I traced the bottom of the tin and ran it through the countdown to Christmas CB embossing folder where I used just the 25 in the star. Perfect! I purposely used white core cs so I could sand it. Added MS glitter to the star portion for bling.

Added some pearls and gold beads and rhinestones to float around inside. Took the same cs and embossed around it some more and sanded.

Used my Crop-A-Dial to punch holes in the tin and strung the SU ribbon through it. Super simple.

Wouldn't this make a great gift topper and the recipient can take it home for their tree. Or put a child's or pet picture inside!

Wearable gift - Photo Slide key ring


I made this for my pocketbook. To hang on the side of my handle. It is a pic of me and my three children this past Mother's Day. (Yes I am the shortest)
I tried to follow along the Cuttlebug Challenge so the items that are CB is the back side of the key ring. I embossed the tin with the hearts CB folder and wrote the year inside the heart.
The photo slide, and charms are from Oriental Trading. I can switch out the pictures or change the color of the slide to coordinate with my pocketbook if I choose.

Friday, July 30, 2010

Yummy for your Tummy gift


At the Cuttlebug Challenges blog - a challenge was to make a yummy gift - while the item used was a chocolate bar, which I had none. I used pop corn.
The standard bag of microwave pop corn is what I used. This is how I made mine.
So you take a piece of paper 8 1/2 x 11 -yahoo no cutting.
Score it at 4 1/2 on the long side and 1 1/2 on the other end.
Fold it like an envelope and glue the sides together then crimp - leaving the top flap open to slide in the pop corn bag.
I taped the back down and added a snowflake to match the front.

Of course I'll have to eat this bag as it may be stale when Christams comes - but I think I will make these for my niece and nephews and my dd college friends.

Holiday Helper Keeper


At The Cuttlebug Challenge Blog - they create a little keepsake album - I wanted to do a little bit different. I wanted to create a helpful holiday keeper.

I took one of those 4 x 6 memory books you get at the Dollar Store.
Covered it with some appropriate paper and proceeded with the following pages:
Stamps
Holiday card listings
Gifts to buy or look for (one page per family member)
Receipts
Family pictures
Family favorite Recipes
Things to make
and so on

Each page has been embossed with a different CB folder.

I hope you also find this helpful and it will fit in a common size pocket book too.
If I get ambitious - maybe a make a few for family grab gifts. Hee Hee

Oh Christmas Tree treat box ornament

At the Cuttlebug Challenge Blog- they wanted us to make a 3D Christmas tree that you can put treats in.
This one was made from a 4 x 8 piece of card stock scored in 1/2 and then scored on the diagonal in the middle of the small sides.

You take the Crop-A-Dial and punch holes at the top and tread the ribbon. This one is rather large and you can fit a fair amount of wrapped candy. I have made smaller ones last year that you can see HERE.
The base card stock was run through the 5 x 7 Ornaments folder and inked to bring dimension. I added large glitter - which look horrible when photographed so please excuse that. Looks better in person. The little snowflakes is a mini punch by Marvy Uchida.

Michael's coupons

Two card from one cut - Cuttlebug Challenge


This was a great challenge at the Cuttlebug Challenge Blog You had to take their cut file - but I do not have DS - so I improvised with a Sizzix Die.
This allows you to take the negative and make a second card - no waste!
The backgrounds are CB embossing folders, the border punches are from MS. Rhinestones are from M's.

Thursday, July 29, 2010

double embossed music Birthday Card

e

Challenge at Cuttlebug Challenge Blog was to create a musical card.

I embossed the guitars with black embossing powder and then embossed the whole card with the Allegra Embossing Folder from CB. The guitars and sentiments are from the No 1 Birthday Stamp set from SU!
Large Eyelets from We R Memory Makers

Tuesday, July 27, 2010

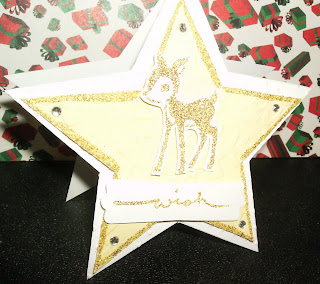
Star Light ... Cuttlebug Challenge


Here is another challenge From Cuttlebug Challenges provided to us - to create a layered star card. I used Wild Card to cut the star shapes. I ran both layers through two different embossing folders. Glitter the cute dear (SU!) and sentiment (SU!) with embossing powder from Stampendous. Added a few rhinestones in each point. Inside sentiment (I added a rhinestone to the exclamation point after I took the pic) from Inkadinkado.
Entering this in the Cuttlebug Challenge of course as well as Rosie D's creatures big and small.

Regal Scene - Cuttlebug Challenge


I tried to duplicate the scene for the challenge - but I do not have those Spellbinders.

I first embossed a 4 1/4 x 5 1/2 piece of white core blue cs with the winter scene CB folder and sanded it with my sanding block. I put that aside and cut an oval with my Coluzzle. I cut another frame with my Coluzzle, and used embossing corners from Cb as well. The snowflakes are a MS punch which I added some sparkle bling of rhinestones to the center. This challenge really challenged me and I plan to make one more.

sparkle negative snowflake card


At the Cuttlebug Challenge a multi layer snowflake card was created with the negative of the snowflake ornament below.
The base card was run through the 5 c 7 snowflake embossing CB folder. I then layers inside the glitter snowflake negative. And under that is the deep blue to show off the snowflake. I added pearls here and there. The title sparkle was stamped multiple times in different hues. (sentiment from SU)

hanging glitter snowflake


At the Cuttlebug Challenges hourly Christmas challenges - we were to create a couple snowflake items. One is this 3D ornament. The next is a card which will come in the next post.

I did not have the CB one that was mentioned but I did have a rather large one from Sizzix.
I glued 3 together and ran satin cording to hang. Now only to keep this safe for a few more months!

Monday, July 26, 2010

Cuttlebug Challenge Stand Up Z fold card


Yesterday was Christmas activities for 24 hours - so I am trying to catch up.
The early hours was this Z fold card I Decided to make two since I was cutting per the directions. MS border punch, SU sentiment stamp, the Santa is a stamp by Tara Reed Designs. CB embossing on the greens lower portion (Swiss Dots) and the circle tab is a CB round snowflake minni embossing folder that I think I never used. This was perfect to use to hold up the main image.

Just something I whipped up Monday

The Girl Creative
Link up something you have made - I linked up my tags from the post below