This card is a little rustic or vintage or repurposed.... (FYI the background card is not as pink as the camera picked it up)
I picked up 5 different fall colors paint chips at the Hardware store and ran them all through my big shot using Lawn Fawn leaves dies (love the cuts)
I ran vintage page of a book through a new background die from Tim Holtz / Sizzix to represent "wind"
Added some twine to the side and left this no sentiment note card to send to my daughter.
Showing posts with label repurpose. Show all posts
Tuesday, October 24, 2017
Saturday, May 27, 2017
Zippered Cassette Purse
Created these tonight, keeping these for myself until I can purchase more supplies as I used what I had on hand. Then I'll be selling these.
Thursday, February 2, 2017
Wooden Spool Necklaces
Made these 4 spool necklaces to sell at my spot in the store. Signature Finishes in North Grafton.
Took the spool and wrapped lace or ribbon around it and glued in place.
Added links of chain through the spool and secured each end with a jump ring.
Added various items to the bottom and finished off with a clasped cording about 24".
Took the spool and wrapped lace or ribbon around it and glued in place.
Added links of chain through the spool and secured each end with a jump ring.
Added various items to the bottom and finished off with a clasped cording about 24".
Thursday, November 3, 2016
Book page wreath
I saw this wreath advertised at a class which I thought was right up my alley.
Re-purpose an old book which I bought from the Salvation army for .99, sad to say this book was from 1948; The Valiant Lady. (This book was about 6" x 9")
Cutting a 10" x 10" square from foam board, I drew two circles one at 8" in circumference and then 4" circle within that.
Punched a hole in the square and ran a jute string through it so I can hang it when done. (see above drawing)
Taking the pages from the book (or if you are using music sheets you may need to cut them down)
I ripped them out and rolled them into a cone, to make the cone start at the lower corner of the page and roll it into a cone shape. I taped the upper side to keep it together.
To know where to place it on one of your two rings (on the white foam board) you stapled about 1.5 " up from the bottom point of the cone.
Taking hot glue gun, glued them by laying the stapled area to the outer ring. I believe there are 32 cones glued to the outer ring of my first layer.
I continued again to fold, tape, staple and hot glue the next grouping to the 4" ring. (I think 25 cones )
The 3rd layer, I rolled the cones on the long side of the page starting in the middle of the long edge thus creating a shorter wider cone and glued (8) them to the center. because there was a gap, so I added the 4th layer (8 more) which were placed between the cones on the 3rd layer.
I wasn't sure what I wanted to do in the middle , I had a few of these medallions I made for Christmas ornaments ...and glued one in the center (the medallions were made from old music sheets) .
I found the perfect spot in my home above my stairs when you walk into my house.
Re-purpose an old book which I bought from the Salvation army for .99, sad to say this book was from 1948; The Valiant Lady. (This book was about 6" x 9")
Cutting a 10" x 10" square from foam board, I drew two circles one at 8" in circumference and then 4" circle within that.
Punched a hole in the square and ran a jute string through it so I can hang it when done. (see above drawing)
Taking the pages from the book (or if you are using music sheets you may need to cut them down)
I ripped them out and rolled them into a cone, to make the cone start at the lower corner of the page and roll it into a cone shape. I taped the upper side to keep it together.
To know where to place it on one of your two rings (on the white foam board) you stapled about 1.5 " up from the bottom point of the cone.
Taking hot glue gun, glued them by laying the stapled area to the outer ring. I believe there are 32 cones glued to the outer ring of my first layer.
I continued again to fold, tape, staple and hot glue the next grouping to the 4" ring. (I think 25 cones )
I wasn't sure what I wanted to do in the middle , I had a few of these medallions I made for Christmas ornaments ...and glued one in the center (the medallions were made from old music sheets) .
I found the perfect spot in my home above my stairs when you walk into my house.
Tuesday, June 7, 2016
Barn wood signs
With old pieces of barn wood from my house I looked at various sizes torn down and thought they would make great stencil signs to hang up, give as gifts and sell.
Here are 4 I made yesterday using the PLAID Folk art set called Family item 30740 from Michaels Craft Store.
Thursday, December 31, 2015
Repurpose Powerade bottle into little container
My son drinks these for his lunch at work and brings them home to recycle.
So I cut the top off and with two caps I complete a little container for your purse.
I gave these out and the women loved them. I keep Ibuprofen in mine but you could store a necklace or two, rings, hand cream etc.
So I cut the top off and with two caps I complete a little container for your purse.
Friday, October 16, 2015
Repurpose old fashion Christmas light bulbs
I bought a bag of these at a yard sale years ago and finally got to glitter them up.
The glitter was ultra fine (actually was a fall clearance bundle also on clearance years ago.) Mod Podge Matte the outside and not the cap. Added green hook wires and hot glued ribbon around the wire and cap. Final step to keep glitter sealed in (before adding ribbon) was a clear spray sealer.
Thought about what else it needed so punched out a saying and hung it off the wire. Now to package up for craft fair!
The glitter was ultra fine (actually was a fall clearance bundle also on clearance years ago.) Mod Podge Matte the outside and not the cap. Added green hook wires and hot glued ribbon around the wire and cap. Final step to keep glitter sealed in (before adding ribbon) was a clear spray sealer.
Thought about what else it needed so punched out a saying and hung it off the wire. Now to package up for craft fair!
Thursday, October 15, 2015
Metal star ornaments
I repurposed some metal flashing into star ornaments.
Sizxix star die
Wire
Beads
Crop-a-dial to punch holes in metal
Sizxix star die
Wire
Beads
Crop-a-dial to punch holes in metal
Thursday, September 10, 2015
Dollar Tree blocks into ornaments
I bought a box of 9 children blocks at Dollar Tree.
Spray painted them and drilled a hole in the top.
Added twine, lace, buttons, etc with my hot glue gun. Lastly I added the hook and twine to hang.
Spray painted them and drilled a hole in the top.
Added twine, lace, buttons, etc with my hot glue gun. Lastly I added the hook and twine to hang.
Monday, September 7, 2015
Repurposed wine bottle for Christmas season
You've may have seen my other wine bottle post, however today I decorated the center with snowflaks felt trim from Martha Stewart in addition to gluing twine and flat back pearls. Getting ready for gift giving and craft fairs.
Reclaimed wood laundry sign
I was given a pile of old house siding /shingles and I think they are a perfect size for signs.
I picked this one from the pile as it still had a nail in it and it had a knot hole.
Steps:
Bleached the sign and let it dried in the sun (didn't take long as yesterday was nearing 90°)
Spray paint in red
Using white acrylic paint and 2" stencils stamped the words
Added two very old clothes pins to twine
Edges the sign with white paint
Sprayed a protective layer of Mod Podge
Friday, September 4, 2015
Repurpose wine bottles
I was given some wine bottles and got some ideas from Pinterest.
I bought some white gloss spray paint and sprayed a couple layer.
Taking twine from Dollar Tree I glued it to top and bottom segments.
Added various items such as ribbons and a button.
I bought some white gloss spray paint and sprayed a couple layer.
Taking twine from Dollar Tree I glued it to top and bottom segments.
Added various items such as ribbons and a button.
Thinking of you Get Well card
I mailed this card in hopes the recipient feels better
The background is the script embossing folder which I layered ribbon on it.
Cut out circles for the sentiment and raised on foam square.
The leaf believe it or not is from a wallpaper sample.
Thursday, July 23, 2015
6x6 tile made into a trivet
Another gift idea. I picked up 8 of these 6x6 tiles for .25 each!
Printed the image on photo paper and Mod Podge it to the tile. I used my brayer to go over it so it wouldn't pop up.
Let it dry for a few hours then took a Gloss Mod Podge spray and went over the top twice.
Printed the image on photo paper and Mod Podge it to the tile. I used my brayer to go over it so it wouldn't pop up.
Let it dry for a few hours then took a Gloss Mod Podge spray and went over the top twice.
Wednesday, January 29, 2014
Twine wrapped wine bottle
I re-purposed this win bottle twice.
Last year I painted it white and added Epsom salts to the outside. After 6 months or so Epsom salts fall off so it's only a temporary "craft". Most people think it's permanent but it will evaporate and fall off to a dusty mess. It's pretty for a period of time.
However this year, I took the wine bottle and a roll of twine and glued it around and around with Mod Podge. This took about 45 minutes and it stayed very well (it's been on my stove as an accent for a couple weeks now).
The tassel was hand dyed by my friend Louise and I hot glued it in place.
Added two wooden button and some jute and I think it came out super simple!
Last year I painted it white and added Epsom salts to the outside. After 6 months or so Epsom salts fall off so it's only a temporary "craft". Most people think it's permanent but it will evaporate and fall off to a dusty mess. It's pretty for a period of time.
However this year, I took the wine bottle and a roll of twine and glued it around and around with Mod Podge. This took about 45 minutes and it stayed very well (it's been on my stove as an accent for a couple weeks now).
The tassel was hand dyed by my friend Louise and I hot glued it in place.
Added two wooden button and some jute and I think it came out super simple!
Thursday, January 9, 2014
Re-purposed many items to make Thank You card better
The card below - I actually dissected a card base kit from Stampin' Up. I was not fond of the kit itself and re-purposed the white card stock and was left with this panel of hexagons.
The five hunter green hexagons are actually opened window pieces (which I saved the 5 pieces and will re-purpose those as well). I re-purposed the hunter green card stock actually from a file folder!
It is a very manly and textured folder (click the pic you should be able to see the linen texture of the green folder) I thought it played well with the color scheme on the hex card.
I then stamped Thank you off centered on purpose from Perfectly Penned stamp set from Stampin' Up.
The white top layer is actually raised on foam squares to add dimension.
I'll store this in my card box when I need a quick thank you card.
The five hunter green hexagons are actually opened window pieces (which I saved the 5 pieces and will re-purpose those as well). I re-purposed the hunter green card stock actually from a file folder!
It is a very manly and textured folder (click the pic you should be able to see the linen texture of the green folder) I thought it played well with the color scheme on the hex card.
I then stamped Thank you off centered on purpose from Perfectly Penned stamp set from Stampin' Up.
The white top layer is actually raised on foam squares to add dimension.
I'll store this in my card box when I need a quick thank you card.
Wednesday, January 8, 2014
Valentine Cards three ways
I re-purposed more paint chips into these cute Valentine Day cards for my three children
This one I mounted on black card stock and used a black sharpie to draw the "string". I used a lunch plate to make the perfect shape.
This card I used red card stock with the Little hearts also from the Stampin' Up Embosslit!
And the last one also in black, but in the portrait set up.
The sentiment is from SU Teeny Tiny Wishes set.
This one I mounted on black card stock and used a black sharpie to draw the "string". I used a lunch plate to make the perfect shape.
This card I used red card stock with the Little hearts also from the Stampin' Up Embosslit!
And the last one also in black, but in the portrait set up.
The sentiment is from SU Teeny Tiny Wishes set.
Pennant Happy Birthday Card
In the spirit of re-purposing, I created this birthday card using paint chips from the hardware store and SU punches (pennant double punch) and Perfectly Penned stamp set.
Quick, fun card. BTW: I used a lunch plate to get the perfect arch to hang the pennants on.
Click on the pic to see the shimmer in the paint chips, makes a great masculine birthday card.
The pennants are raised on foam squares.
Quick, fun card. BTW: I used a lunch plate to get the perfect arch to hang the pennants on.
Click on the pic to see the shimmer in the paint chips, makes a great masculine birthday card.
The pennants are raised on foam squares.
Tuesday, January 7, 2014
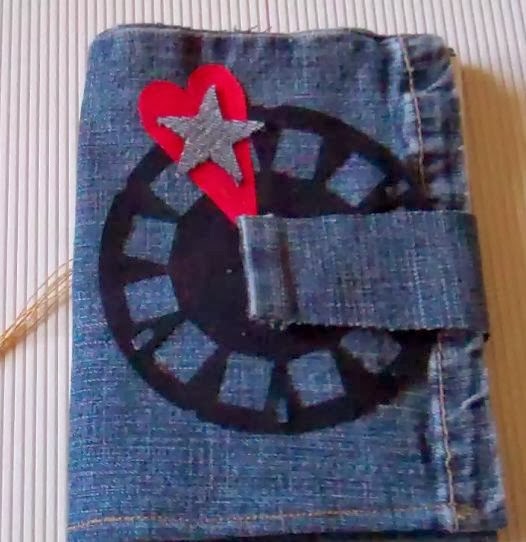
Travel Journal from old jeans
I made this Journal for my daughter who went on a trip. I gave it to her back in November and recorded it prior to presenting it to her and just got the time to upload the video to yt.
I used a pair of her old jeans to make the cover, I sewed the bottom to make a finished edge and also to add the closure.
With other cloth material re-purposed, I cut of the view master (film reel), the star, heart, and pocket. (I used Sizzix dies to be able to cut out the elements.
Please watch the video to see the inside and hope you all make one and re-purpose items as well!
I used a pair of her old jeans to make the cover, I sewed the bottom to make a finished edge and also to add the closure.
With other cloth material re-purposed, I cut of the view master (film reel), the star, heart, and pocket. (I used Sizzix dies to be able to cut out the elements.
Please watch the video to see the inside and hope you all make one and re-purpose items as well!
Saturday, December 14, 2013
Tiles
This has been on my craft to do list for some time. I got the opportunity to purchase some tiles at Home Depot and stamp using my Martha Stewart Butterflies. Gorgeous.
Using Mod Podge as a sealer a couple times and felt circles on the bottom made these a striking set.
Subscribe to:
Posts (Atom)