I've seen these all over the crafting sites and my daughter asked when I would make them.
I had bought these very small glass ornaments from Michael's and was not sure what I was going to make with them.
Since I got a container of black seed beads, I used them as the "eyes" and "buttons". For the carrot, I took a toothpick and colored the ends with an orange sharpie, broke it off and added them to the ornament.
For the melted snow, I used Epsom Salts. Added a piece of plaid material as the scarf to the hanger portion on top. These are very small ornaments but such a cute idea.
These are very small. To make them I used my big Sizzix die that has 4 different circles. To make mine, I used the 2 1/2" and 1 3/4" to cut the white felt. then sewn a gathering/running stitch along the outside and stuffed the little circles with fiber fill.
I hot glued the circle plumps together and tied on a piece of material for their scarf. Their eyes are little black seed beads. I think they are so cute and they are tiny! I got this idea from another crafter, if I find it, I'll post the original link.
Even though Christmas is over, I made these Friday morning just for something to do.
I used the Stampin' Up two tag Sizzix die, and the gorgeous reindeer stamp. I inked the edges and added glitter glue.
Love these and will keep them for next year's gifts.
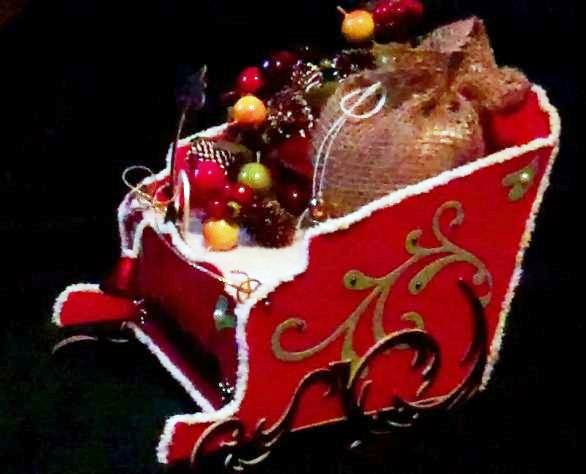
I used a pattern from Jim Hankins, The Gentleman Crafter and immediately created my version.
Jim used pattern paper, I painted and repurposed an old FedEx shipping box.
I hand cut the sides of the sleigh and with multiple coats of acrylic red paint I set it to dry.
I measured and followed the back piece by using my On The Edge Sizzix Tim Holtz die to create the fancy back and front edges.
All sides, bottom and the secret seat/lift compartment were all hot glued in place.
I created the headlights by using snowflake brads
The license plate is also a Sizzix die that I glued to another piece of the re-purpose box.
The reins are made by threading the gold glitter cording through soem retired Stampin' Up hardware.
My video is available on YouTube you can click the link or watch it below.
Hi Folks,
You may have seen my post from last year, but since I sold out of my crochet necklaces at last years craft fair. I made more for this year's craft fair too!
I sell them for only 5.00
Here are a few of the couple dozen I made.
The silver bead you see is actually the end slider to allow for different lengths.
This card was a CASE and I loved the layout so much that this is my version using scraps!!
Love it! Got to keep the scrap pile down.
This card was made for my daughter who turned 22 last week.
The butterfly, the border punch, the flat back pearls and sentiment are from Stampin' Up. Most of the scraps I think are as well.
I made these last week and mailed them to my daughter and her room mates in college. I am sorry but I am just getting around to posting them so I am going to post all at once.
I made these pumpkins by punching 3 ovals and adhearing them to make a pumpkin. I added a stem and some stickers.
These are those sour cream "type" containers which I filled with Hershey nuggets.
cut a piece of printed paper and glue and crimp the ends. You can see my directions here.
These are premade boxes that I used the Large Martha Stewart punch to make the spooky fence and the mega wpider web, I filled these with 100 grand chocolate bars.
Using the same elelments as my friend to friend card, I changed up the size and layout a bit by using the foiled ebossed card that I picked up at the florist. It matched my card very welll and it added a little glitz as well. This has no sentiment as it is intended to be a note card.
I used the Cuttlebug Swiss dots folder to emboss the layer that the butterfly (Martha Stewart) was cut from
then put back on. The next layerwas border punch with Hearts punch also by Martha. Next was the note card from the florist (click the pic and hope you can see the beautiful artwork) next layer I used the old ticket punch from Stampin' Up.
My daughter's friend birthday was yesterday so I am quickly getting this card I made this morning in the mail to her.
I used the Stampin' Up set Simply Soft to create this card. While it is very hard to line up the two stamp method - it came out ok.
I did some sponging for the sun and the clouds and grass. The image colors did not come out as they are in real life. Perhaps the lighting to camera to web just throwing it off a bit.
I added some Dazzling Glitter glue also from SU to the flowers though you may not be able to see it.
The inside I cut a strip of card stock to reflect the border punching I did to the top and added a butterfly.
I made this for my sister whose birthday is in a couple weeks, the base is concord crush Stampin' Up card stock as well as the postage stamps which I cut from a Spellbinders die.
I picked up this shiny tulle at the fabric store in which I cut a strip and tied a knot. To keep the tulle on I used a glue dot (love Glue Dots!)
The base white layer is a new Spellbinders Impressabilities which you run through your machine (I had to look online to get the sandwich for my Big Shot), then on the raised areas I used my Cat Eye inks to run along to capture the raised image.[You may have to click the picture to see the detail, camera is hard to pick up white and in artificial lighting)
Sentiment and punches are from Stampin' Up inked in Concord Crush as well added rhinestones for bling!
Thanks for stopping by.
I made this card for a dear friend of mine and mailed it today, hope it cheers her up!
I used the Martha Stewart Butterfly punch and added Stampin" Up dazzling diamonds (glitter glue)
There are 4 layers to this card, Inked and corner punched the bottom layer (corner ticket punch was from an Old Stampin" Up catalog)
Next layer I punched using the fabulous hearts Marther Stewart border punch.
Third layer is embossed with Cuttlebug Swiss Dots embossing folder.
last layer is the butterfly (Martha Stewart) and the sentiment from Teen Tiny Wishes (Stampin' Up)
Since I had the lattice die out and I've seen folks make the cross with it, I wanted to give a try at making my version.
Take the die image once cut, and turn it at an angle, remove the ovals and trim carefully revealing a cross.
I embossed the Stampin' Up card base with the Tulip embossing folder, glued the cross on. Then took the butterfly punch and glued that to the mid section of the cross post.
To dress it up I added the teeny Boho flower punch flower to the cross section and to the butterfly. Finished it off with a tiny flat back pearl. Love these - must get more!!!
The sentiment is also from Stampin' up and punched it from the scallop oval punch, mounting it on foam squares.
Created these two cards this past weekend but I am just getting around to posting them. Using my scraps from my Stampin' Up pile - these cards were created.
Embossing the white layer and border punched with the pretty lace trim. Using a 5 petal flower punch on one card and the Butterfly punch on the other, I punched out the flower then turned it and layered it back on with a foam dimension square.
The Butterfly card is a litle different in which I used stripped of scraps to cover the butterfly. Please click the picture for a better view.
The sentiments I used on both cards are from Teeny Tiny wishes which I layered on a couple more punch outs.
Here is the inside of the cards, again used some scrap whisper white card stock and some mini punched shapes.
I saw this layout very early this morning while blog surfing however her card had no embossing. So I took my hand at it with the elements I had.
Base card is scored at the top A2 size using whisper white card stock, one card is embossed fully with a Cuttlebug folder, and the other has an embossing Sizzix border (SU!) folder just to the bottom portion.
The rest of the layout is the same for both cards.
Cut your doily it could be a real doily or one you cut with your Cricut or Sizzix die into 4 equal pieces. My doily was about 4 x 4 in size.
Cut your mats at 3" x 3" and 2 7/8" x 2 7/8"
Sentiment strip is 4 1/2 x 1/2" inked and raised by either foam squares (Think of you) or by curling the paper a bit (Mother's Day card)
Hope you give it a try. I created a video to help view the elements I used.
I used a sketch I believe I saw in a Stampin Up publications (I had torn out the sample card and threw the rest away) and put my own twist on it. Their version was feminine and was not embossed.
All material used is Stampin Up. I embossed the A2 cardstock using an embossing folder (Sizzix SU!). Used some scraps from Well Worn paper pack cut to 4" x 3".
Added some linen thread to the top and through the embosed button. (I tried to color it with ink to look like a wood button).
The sentiment is a portion only of a full stamp image from the set of EasyEvents that I just inked the sentiment and not the cupcake!