It's been beautiful these past couple days and thought to make a few Christmas cards. Here's a quick card I used two single stamps from Michaels and the stars from Sizzix. All old items but still worth keeping.
The snowflakes are stamped with a brown ink pad that is not very inky but I wanted them light and airy so it totally worked for me.
After posting, I had forgotten to score a couple lines above and below the sentiment.
Here's another simple card, I cut out a rectangle from cardstock and used it as a template to sponge blue ink for the background and then stamped the sentiment in black Stazon ink. Added a rhinestone to the swirl too!
Took craft card stock die cut the tree and inked the edges with brown ink and raised it on foam squares.
Inside I used a fancy corner punch to jazz up the inside.
Needed a couple quick card, and these were clean and simple.
Stampin Up bird punch
Stampin Up sentiment (my favorite)
Paper piercing in lower right hand corner
Rounded the cornerd with an old Creative Memories punch
I created this aperture card using the framelit die from SU. I die cut it from the old olive card stock to allow for the tree stamp (From Christmas Lodge) to show through.
The tree has 5 little rhinestones on it however the camera did not pick them up due to it being evening here.
The sentiment is cut and raised and accented with the rhinestones.
Simple but elegant. I am well on my way at completing the cards I need to mail on December first!
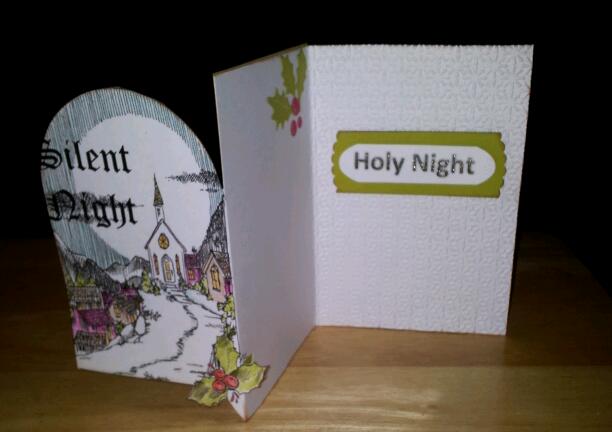
As July guest design team member at the C.R.A.F.T Challenge Blog I created this card using the image from Rick St. Dennis Silent Night. The challenge was Christmas in July.
What I did was print it landscape and proceeded to make a tri panel card.
The first panel I cut out the dome shape and colored with my SU inks and blender pen.
I added glitter to most of the image and to the inside sentiment (you may not be able to see it).
The second panel I used a Sizzix die to cut the holly and berries. This would be for the sentiment or note to the recipient this holiday season.
The last panel I ran through the SU embossing snowflake embossing folder and added a computer sentiment of Holy Night to go with Silent Night... Holy Night.
The image was in the save scrap pile, so to make a quick card I mounted it on a layer of black cs and then on this textured brown card stock.
I added a brown tone half pearl to the center image and small white ones to the spoke of the floral stamp image. (You may not be able to see the white pearls due to the lighting)
With frost on our cars this morning, I stamped a couple of these cards to pass the time before work.
The stamp set is from Stampin' Up Snow Swirled and the ink is Baja Breeze.
To make this card, it can be done with one piece of whisper white.
Cut Card stock at 4 1/4" x 11"
Cut remaining layers at: 3 3/4" x 5" run through the swiss dots embossing folder and inked.
Cut a 1 3/4" piece at 4" and stamp the sentiment in the middle of the strip and ink.
Cut two 1 1/2" x 1 1/2" and stamp the smallest snowflake and ink. I added two crystals to the center.
Silhouette of Santa and a little girl is cut from A Child's Year Cricut Cartridge, I believe 3/5".
The following items were also in my "cast off container" and I was able to put this sweet card together.
I chose a black card stock base and ran it through the Snowflake Sizzix Stampin' Up embossing folder. (You may have to click the picture to see the embossing.
Thre three silver snowflakes are from a Martha Stewart punch and the sentiment is from Stampin' Up.
This is another card from Basic Grey Figgy Pudding card set.
The base card measures at 4 1/4" x 6 1/4" and is a lovely Christmas deep red cardstock.
The aperture is cut at 2" x 2" to allow the sentiment "Joy" to show through.
The decorative paper has the matching square removed and measures at 4" x 5 3/4"
The holly and berries are chipboard pieces inked and glued to the base of the card.
Yes it snowed here again! We in New England want to have a bit of true spring opening!!!
I created this card when I made the other set shown here using the Sizzix two step Snowflake #4 die.
This time I mounted it on kraft colored cardstock and inked the edges. The My Minds Eye pattern paper I inked and used the edged of my scissors to distress the layer, I keep forgetting that technique!
This time from the Sizzix sentiment strip, I used the word Noel, also glittered with SU Dazzling Details glitter glue as well as the holly.
Created this card (actually two of them) last night with a couple Sizzix Dies. We have had such a snowy week with this being the middle of March!!!
I ran the kraft card stock through the cutting plate first to cut the snowflake shape, next I lined it up in the embossing folder that came with the die to get the doily effect. To emphasise the embossing, I ran brown ink over the raised portions.
Mounted it on My Minds Eye light red pattern paper cut at 4 x 5 1/4" then mounted it on black card stock to make this A2 size card.
The sentiment Peace is a long worded Sizzix die and on this set of cards I used the word Peace. (Stay tuned for the ones I used with the another word). I used Stampin' Up Dazzling Details glitter glue on the sentiment (you'll have to click the picture to see it) as well as the holly. The holly is also on the die strip!!! If you click the picture, I hope you can see the inking and the glitter on the holly as well.
This is a long card that would fit in a business size envelope. It measures 3 1/2" x 8 3/4".
The next layer is a two tone paper (looks like two layers!) and that measures at 2 7/8" x 8 1/4" which I inked.
The tree is an open cut die cut and matching chipboard piece (all from Basic Grey) which I glued together then inked the edges of the tree.
The sentiment is a rub on "Joy to the World", fabulous easy card!
This card is made using more Basic Grey paper from the Figgy Pudding Card kit, however I cut out snowflakes from the 2012 Spellbinders Snowflake series and added gems to the center. The circle in the center is embossed which may be hard to see in the photo.
The sentiment is a rub on "Peace on Earth"
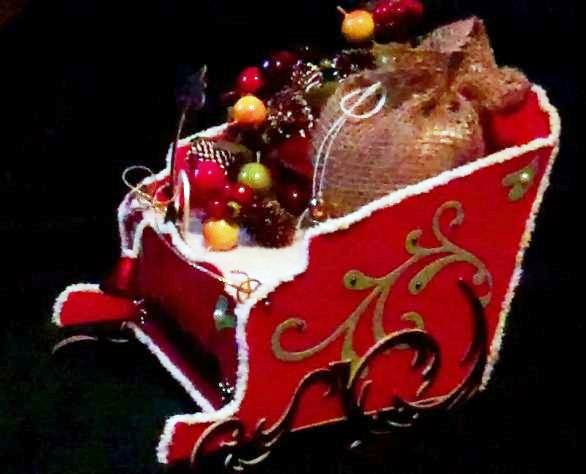
I used a pattern from Jim Hankins, The Gentleman Crafter and immediately created my version.
Jim used pattern paper, I painted and repurposed an old FedEx shipping box.
I hand cut the sides of the sleigh and with multiple coats of acrylic red paint I set it to dry.
I measured and followed the back piece by using my On The Edge Sizzix Tim Holtz die to create the fancy back and front edges.
All sides, bottom and the secret seat/lift compartment were all hot glued in place.
I created the headlights by using snowflake brads
The license plate is also a Sizzix die that I glued to another piece of the re-purpose box.
The reins are made by threading the gold glitter cording through soem retired Stampin' Up hardware.
My video is available on YouTube you can click the link or watch it below.
Hi all, this is a album kit I have had forever. The paper and embellisments are from Me and My Big Ideas. (In the video I stated it was My Mind's Eye in error. Lack of sleep will do that to you!).
I inked all the edges and adheared the pages to chipboard using a glue stick. Tied on ribbon to the binder rings that I had in my stash.
Please see the video for more pictures of the album. Thanks for looking!
I love this layout sketch from Pagemaps (see below)! I am not usually a fan one one pic on a page - being frugal and all, but this is the only Christmas pic I got as a group shot so it fit it perfect as an entry into Wacky Wednesday More Than Favors using the layout and for Daring Cardmakers for the color scheme
Included in the picture is of my kids (3), my brother's (3) and our younger sister's kids (3) from Christmas Eve! To complete the layout I used Colorbok papers and letters, Sizzix flourish dies and Stampin' Up buttons. The feather and lace is from my stash.