Showing posts with label video. Show all posts

Sunday, March 17, 2013

Business Size Mini Album


I made this mini album this weekend using My Minds Eye paper stack and junk mail business reply envelopes.


Here is the video with details.
Take 4 business size reply envelopes that were 8 1/2" x 4. I scored each one at 2 1/2" to make two pockets.
Once I covered each envelope, the pull out pocket mat was 8 1/2" 3 3/4" and then scored at 6". I used a deep Martha Stewart border punch to add more details to the page.

The photo mats are 4 1/4" x 3 1/2" inked and used a SU punch as a pull tab. (It's retired punch but the best tab punch out there!
Hope you give it a try!

Monday, February 11, 2013

Beaded spine sketch journal

I could not wait to make this type of spine with beads!!!
All products are from recycled items. I did not have to buy anything - whew!!!
The base of the journal was a brownie mix box. Yes - I cut it down and the side of the box was the perfect 1.5" spine!

The beads were from a yard sale/flea market find a couple years ago.

The paper I used was from my stash from Stampin' Up!. Please enjoy this video and I made another one tonight!

Autumn Mini Album

I enjoyed making this mini album yesterday, as we just got two feet of snow, I liked the fall colors.
 Here is a double page spread with some simple mats and fabric leaves.
Here is the cover, cut from Cricut cartridge. I inked and raised some elements. Please click the picture or watch the you tube video for all the pages of this 6 x 6" top loading s.e.i album.

Sunday, January 27, 2013

How to use Beeswax with crafting

I was asked to make a video on how I created and covered my box as seen in this post.

All the supplies I used was purchased at Michaels except for the craft iron, that was purchased on line by my friend.

Here is my finished product I showed in the video.
If you have any questions please leave a comment.

Saturday, January 26, 2013

Paper Mache Box - tissue paper and beeswax

Ooohhh I love how this box came out. Using Beeswax and Tissue paper from Michael's I attached strips and ovals of the tissue paper to the box. Made a rossette and hot glued it to the top of the box.
Added flat back pearls to the key and the box cover lip.
All items I bought from Michael's craft store.


Please enjoy this video!

Tuesday, November 20, 2012

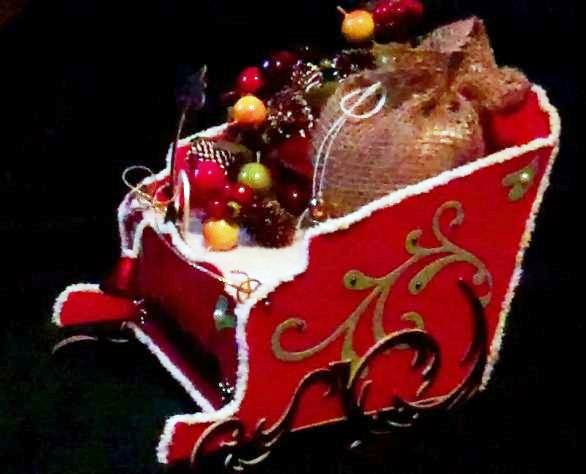
Santa's Sleigh

I used a pattern from Jim Hankins, The Gentleman Crafter and immediately created my version.
Jim used pattern paper, I painted and repurposed an old FedEx shipping box.
I hand cut the sides of the sleigh and with multiple coats of acrylic red paint I set it to dry.

I measured and followed the back piece by using my On The Edge Sizzix Tim Holtz die to create the fancy back and front edges.

All sides, bottom and the secret seat/lift compartment were all hot glued in place.

I created the headlights by using snowflake brads
The license plate is also a Sizzix die that I glued to another piece of the re-purpose box.

The reins are made by threading the gold glitter cording through soem retired Stampin' Up hardware.
My video is available on YouTube you can click the link or watch it below.

Sunday, October 7, 2012

Simple card layout done two ways

I saw this layout very early this morning while blog surfing however her card had no embossing. So I took my hand at it with the elements I had.
Base card is scored at the top A2 size using whisper white card stock, one card is embossed fully with a Cuttlebug folder, and the other has an embossing Sizzix border (SU!) folder just to the bottom portion.
The rest of the layout is the same for both cards.

                          
Cut your doily it could be a real doily or one you cut with your Cricut or Sizzix die into 4 equal pieces. My doily was about 4 x 4 in size.

Cut your mats at 3" x 3" and 2 7/8" x 2 7/8"
Sentiment strip is 4 1/2 x 1/2" inked and raised by either foam squares (Think of you) or by curling the paper a bit (Mother's Day card)

Hope you give it a try. I created a video to help view the elements I used.

Rosewood ColorkBok Scrapbook mini album

I picked up this pad of beautiful floral print ColorBok scrapbook papers at Wal-Mart for 5.00! I love ColorBok selections and creations.

Using my creation process of minis I went to town to create this using some new Martha Stewart and Spellbinders supplies.

Had some old silk flowers to tie the theme and papers together which I hot glued to the cover. Please see the video for more details if you like.

Saturday, October 6, 2012

Crackle Paint Fall tag

I used Ranger's Pine Needle crackle paint by Tim Holtz on my hand made tag.
I've had this paint for some time and finally used it, I guess I hoard my craft supplies!
I then embossed the Inkadinkado leaf image with gold sparkle emossing powder

If you like more details I put together a video to show all the details and supplies I used.

Mini Album using Belladonna paper

My sister gave me this Colorbok paper pack for my birthday. They are beautiful and you can get it at Wal-Mart!
I wanted to create a mini album to showcase the paper and of course couldn't resist using my traditional method for pages. (Take an 8 1/2 x 11 piece of solid cardstock and score down the middle, turn score at 2 1/2" or 3" to form the pocket) For a twist I used a brand new Martha Stewart border punch that I purchased off of HSN to add the daily cuts to the pockets.

Please see the video for more details if you like.

Monday, October 1, 2012

Picture Frame from an old CD

I created this sweet picture frame to be given with some baby gifts for a little girl.
I used an old CD I got from Disney and cut out scrapbook paper from Colorbok (Wal-mart) and glue sticked it to the front and back.

I created an easel in the back so it can stand up, if you watch the video you can see how I created this.

Thanks for stopping by!

Sunday, August 26, 2012

Note Pads from recycled boxes

Hi Folks,
Not sure if you are like me - but when I look at decorated cardboard boxes I think of how I can use it creatively!
Here I took a shoe box and cut it down to make note pads. Please peek at the video to see the front and the special back portion of the pads as well.


Here I took awesome printed boutique tissue boxes and cut them down to make note pads for favors at our upcoming cookout! Take a look at the video to see all the special prints!


thanks for visiting!

Chipboard Christmas album

Hi all, this is a album kit I have had forever. The paper and embellisments are from Me and My Big Ideas. (In the video I stated it was My Mind's Eye in error. Lack of sleep will do that to you!).

I inked all the edges and adheared the pages to chipboard using a glue stick. Tied on ribbon to the binder rings that I had in my stash.

Please see the video for more pictures of the album. Thanks for looking!

Saturday, July 21, 2012

Camping 7 1/2" x 8" mini album

I made this mini album for my sister and her family as they are camping for the week.
I repurposed the ard board from a cereal box for the covers, and for the basic idea for the pages I repuposed two large manilla envelopes for pocket pages. All covered in card stock and pattern pages with a camping theme.
It was fun trying to figure out how to cut down these huge envelopes and use some old 8 1/2 x 11" printed scrapbooking paper.


I can't wait till they get back to see how they journaled in it.
Here is a video that takes you through the pages.

Tuesday, July 10, 2012

Pearls and Lace card - two ways

I made two of these cards that are similar in the layouts but I raised the elements in a different way, depending on where I put the foam squares to raise the scallop square or images.


Please see the video for more details.
Most of all the products I used was from Stampin' Up.

Friday, July 6, 2012

Grateful Bird card all leather accents


I made this card as a Thank You for my friend for giving me their leather scraps for card and crafting. I stamped the base card in Old Olive and cut the sentiment, the bird cage and bird from thin pieces of leather using my Big Shot. I am happy to see that the ink took very well to the pieces of leather and stamping also the sentiment was clear.

Please see the video where I take you through the card making process if you like.


Thursday, July 5, 2012

6 x 6 mini album acrylic painted covers made from corrugated box

I wanted to use the natural material from a shipping box. My daughter had received some shoes from an online store and the shipping corrugated box was in perfect condition with hardly any writing to it. I cut (2) 6" x 6" pieces and painted them with my acrylic paints.
Cut 12 x 12 cardstock in half and glue stick the 6 x 12 in half to make studier pages. I bound it all with my Cinch.


Great way to repurpose and get a different feel to the covers of your mini.
Please see the video for more details on the cover and the pages. Thanks for stopping by!

Monday, June 25, 2012

4 x 6 leather swirl mini album

I love how this came out! All paper and card stock from Recollection at Michael's.
The swirl on the cover is a Sizzix die that I cut out of very thin leather!!! Inked and added Stampin' Up flat back pearls, all hot glued in place.


The flowers are also from Michael's recollection collection I got in the clearance section. The lace is vintage lace I bought at  a quilt show hot glued to the covers and a piece tied to the Cinch binding.
The charm on the side is three layers of the leather that I die cut, glued, inked and punched a hole with my Crop-A-Dile. Added a couple jump rings to a seed bead necklace I broke down to make the dangle.

The pages are all 4 x 6 double matted and used the labels Cuttlebug embossing and cutting die. They are inked and raised on foam squares.

You can watch the video for more details, thanks for stopping by would love comments.

Thursday, May 31, 2012

Father's Day 6 x 4.5" Mini Album

A friend of mine requested a mini album for a Father's Day gift. I set out Tuesday night to make this one.

Each double folded page is made by taking a 12 x 12 piece of cs and cutting it in half.

Take the 12 x 6 piece of card stock and score it horizontally at 1 1/2" and turn and score at 6". You will have a double page with folded pockets as seen in the video.
Added simple elements and my Cinch to bind it all.

Monday, May 28, 2012

4 x 5.5 mini album

Hello!
Hope your Memorial Day went well. It was bright, and mildly warm. Rain was anticipated but no thunderstorms arrived. I finished this in the early morning while all was sleeping

This mini album I started a week or so before but had the opportunity to embellish the pages with Prima Flowers and gems from Michael's. I have a video if you like to see the details.
This is similar to the one loaded earlier from a file folder and acrylic items repurposed for this intent.