Saturday in the rain, we placed flowers on our parents grave site... it was nice to gather and bond over the experience.
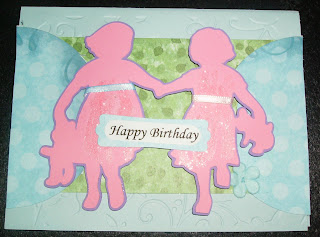
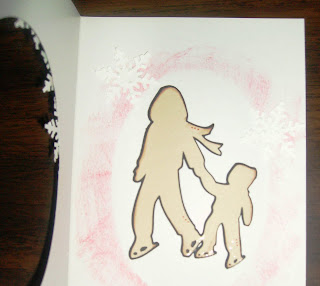
To commemorate, I created this cute card, the image was cut from A Child's Year Cricut Cartridge and the base layer was run through the stars embossing Cuttlebug folder/
Simple card, no entiment, not sure what I'll do with it... for now it'll go in my stash.
Showing posts with label ACY. Show all posts
Showing posts with label ACY. Show all posts
Tuesday, May 28, 2013
Saturday, May 25, 2013
Graduation Invites
I needed to make these quickly and went to work with my Cricut to help me out. Tuesday night I managed to get 10 completed and mailed on Tuesday and Wednesday and I have 10 more to make to give to my son.
I cut the Graduation Caps at 2 inches from the A Child's Year cartridge (raised on foam squares) and the word You're Invited (key #6) from Wild Card at 5". Which is deceiving because it is so small but I lucked out as it fit perfect on the banner!
I have to make more - this time I am cutting the sentiment from vinyl as it will be easier to remove than those darn little pieces from the center and around the words! Stay tune for a "second" look.
Mounted it on a white banner which was cut from a Sizzix (SU! retired) die and onto red cardstock, corner punched with also a retired SU! corner punch, one of my favorite for a more elegant formal look than the traditional square or rounded corners.
Labels:
ACY,
graduation,
invite,
WC
Saturday, May 11, 2013
Graduation Balloon
Using a party store or dollar store mylar balloon, I customized it for a little surprise for my daughter, to commemorate her recent graduation.
I sent her flowers to her apartment yesterday but wanted to create a little something more for the time being.
Using the Cricut tonight, I cut out her name and the year using A Child Year font at 1".
For the congrats sentiment, I used Elegant Cakes at 1 1/2" all from black vinyl.
I've had a long day and at 11:00 PM this took 5 mins to cut and put together.
Congrats Kristen!
I sent her flowers to her apartment yesterday but wanted to create a little something more for the time being.
She will be home for a couple hours tomorrow and want to have this little surprise in her room.
For the congrats sentiment, I used Elegant Cakes at 1 1/2" all from black vinyl.
I've had a long day and at 11:00 PM this took 5 mins to cut and put together.
Congrats Kristen!
Sunday, April 14, 2013
Santa and girl silhouette card
Silhouette of Santa and a little girl is cut from A Child's Year Cricut Cartridge, I believe 3/5".
The following items were also in my "cast off container" and I was able to put this sweet card together.
I chose a black card stock base and ran it through the Snowflake Sizzix Stampin' Up embossing folder. (You may have to click the picture to see the embossing.
Thre three silver snowflakes are from a Martha Stewart punch and the sentiment is from Stampin' Up.
Saturday, April 13, 2013
Thanksgiving Cricut style
As mentioned in my previous post, I am cleaning up my "saved" pieces and trying to use them in current projects.
Here I had the Pilgrim couple cut from my Cricut Cartridge A Child's Year (3") quite awhile ago and a bunch of the yellow ovals. Wonder why I punched so many ovals... so I inked the edge with brown and found a piece of tan paper and the little black brad too!
The only thing I had to use was the doily from Wilton (pack of 30 for $2.00) and the sentiment is from Stampin' Up Teeny Tiny Wishes.
The Pilgrims are raised on foam dimensionals from SU.
Labels:
ACY,
Cricut,
Doily,
SU,
thanksgiving
Thursday, March 15, 2012
Welcome Home
I was comissioned last week to create a welcome home card to a yound hero.
I used A Child's Year Cricut cartridge and a martha Stewart border punches.
I am sorry the picture is blurry, but I took it with my cell phone camera and it was dark in the place.
I used A Child's Year Cricut cartridge and a martha Stewart border punches.
I am sorry the picture is blurry, but I took it with my cell phone camera and it was dark in the place.
Sunday, September 19, 2010
Autumn banner


Made this for my daughter, this completes the season banners for her.
Here is how I made it - I cut 4 x 4 pieces of cardboard from a USPS box I got in the mail.
Punched the holes in the pieces with my crop-a-dial.
Inked all the edges then proceeded to look at my carts for autumn items.
The font I cut the regular and shadow at 1 1/2" from Storybook (Thank you Audrey) and put that aside.
The elements were cut from the following:
A - The apples were cut from Doodlecharms at 2 1/4 and 1 3/4" page 118 key #37
U - The basket was cut from Doodlecharms at 2 1/4" Key #35
T - the leaves were cut from Doodlecharms at 1 1/2" key #34
U - the Pumpkins were cut from A Child's Year page 52
M - The ghost was cut from Paper Doll Dress Up at 1 1/2" 2 3/4", and 3" and the spiders were cut from Designer Calendar page 48 at 1 1/4" and 1 3/4"
N - The turkey was cut from Designer Calendar as well as the Pilgrim hat pg 38
Entering this at Paper Playtime autumn challenge - I just love this time of year here in New England!
oh -and to help me find some icons that I was not sure which page or cart they were on I used. What a big help. You should try it.

Saturday, August 14, 2010
Apple sign
I made this sign for my sister - I was watching her place and animals while she was away and found a shingle on her property. Since she watched out place and our cat this week I wanted to make her a thank you gift.
That got me thinking that I wanted to create a sign for her using the shingle I found. She loves the apple theme so I mimicked a sign I saw in a store.
I painted the background with Apple Barrel paints. I cut the letters and apples from A child Year Cricut cartridge and Mod Podge them on.
Let it dry and Mod Podge all over it again.
Did some sponging to look old. Sorry for the picture quality - I had my sister send me a pic from her phone as I did not take a pic of it beforehand.
This is one place she hung it above another sign she has already in her kitchen.

Sunday, August 1, 2010
Christmas Gift - coasters

I made these to go along with the luminary I made below.
A set of 4 coaster will be a set gift. Not sure who yet, but I hope they like.
The image is cut from A Child's Year Cricut cart at 3".
The coaster is 4 x 4, and the border below is a SU punch.
Betty gave u this idea at the Cuttlebug Challenge and this is the last one for me to finish.
A top coat of Mod Podge seals the paper to the coaster. I believe I have to varnish it so it will be water resistance.
wonderful little luminaries

I was so nervous that I was not going to be able to make these wonderful little luminaries. Capadia Designs showed us how to do this. I do not have DS so - I used a SU! border punch to go around the bottom and cut the ice skating children at 3" from A child years cricut cart.
I glued them to tracing paper as I could not find my vellum which I know I have. I am so please at this ans will make more for sure.

The luminary is 4 1/4" high and the total side is 10" (you need an inch or less to attach one side to for the box.
Insert one of those battery lights as you cannot use a real candle or it would burn!

Wednesday, June 2, 2010
Christmas Stair Step card

I got a little behind in doing one Christmas card a week.
Here is one for Bah Humbug to create a silhouette. I used A Child's year and cut them at 3".
Joy is a Sizzix die and I embossed the snow using Cuttlebug Swiss Dots embossing folder.

Labels:
ACY,
Bah Humbug,
CB
Tuesday, June 1, 2010
Miss you - side stair step card

Believe it or not - everything except the base card - was already cut and in a pile on my desk. You know ... you punch or cut something ot too many and you leave it in a pile. I vowed tonight to use up what I had all over my craft table. The little girl and puppy and kite - were cut from A Child's year oh ... a couple months ago and was just there waiting to be unburied and be used! I thought why not on a stair step card. Misc punches for the sun (MS), butterflies (SU) sentiment K&Co.
Sending this to my friend in FL.

Labels:
ACY,
KandCompany,
MS,
stair step card,
SU
Tuesday, April 20, 2010
Happy Birthday - sister card

I had cut this image from A Child's year cartridge with my sister's birthday in mind. Of course I already made a card earlier today - but she may get two!
I have to mail this today so I stayed up late to finish.
I use the sketch at Get Sketchy to help me complete my springtime card at Cricutters Anonymous.

Friday, March 26, 2010
Thinking of you

Created this card to send this weekend for the upcoming Easter Holiday buy cutting the little girl from A Child's Year Cricut cartridge.
 Sentiment from Stampendous and flowers by Prima. I cut the circle with my Coluzzle.
Used the layout from Lili of the Valley and Paper Cutz challenge was no bunnies.
JOY

Used a Child's Year for the children skating, cut the aperture with my Coluzzle and they nestled inside.

I embossed the Martha Stewart snowflakes and the frame using my Cuttlebug embossing folder.
The JOY stamp is from Stampin' Up as well as the punched mat. All mounted on foam squares.

Followed the sketch at Polka Doodles and the theme from CSAYL and card type - aperture at
| Winter Wonderland |
A Fairy Wish

I created this card for my sister's friend. She has a daughter battling a medical issue and she loves Fairy's and pink!

I'll be entering this in quite a few challenges
Colour Create - to use pastels
Cute Daisy May to use a Fairy
The Cuttlebug Spot - if I had wings
Craft Catz - white and one color
Frosted Designs - to use transparency

I cut the little girl at 3 1/2 from A Child's Year
I ran the base card through the Cuttlebug folder
Added glitter to the wings and star and used the transparency to add movement
Sunday, March 21, 2010
S - Let it Snow

Sorry for a long post - it was difficult to photo this card

I created this card using A Child's Year Cricut cartridge - the base card is cut at 5"
The postage stamp is a freebie from Go Make Something, I used my deco scissors and inked it. The image is raised on foam dots.

The inside is inked using brown on the outside and a Stampin up Scandinavian roller stamp

The S chipboard is painted with acrylic pint and then dusted with Martha Stewart glitter

The ric rack ribbon is from a purchase from Die Cuts R Us
This will go with three challenges
Bah Humbug, Winter Wonderland and Maria's SPS challenge
Friday, March 19, 2010
Patriotic Mini Picture Frames

This is a 4 x 6 picture frame that I embellished by adding these adorable cuts from A Child's Year cartridge. The size I chose was 3 1/4" to fit the frame.

This set is for my brother's birthday next month. He has a whole room in the patriotic colors and scheme.
The images are doubled raise but it is hard to see it.

If you click the picture you can see it in a larger view.
Thursday, March 18, 2010
Winter Wishes

I made two of these cards tonight - similar due to the design but a little different because of the image.
Card base is 4 1/2' from Doodlecharms Cricut Cartridge.


Santa with children image from A Child's Year Cricut Cartridge cut at 2"
Martha Stewart snowflake on one of the cards, misc buttons and ribbon added to the front of the card base.

Inside sentiment is a Sizzlits die.
Entering this in Winter Wonderland a Victorian Christmas
And also in the vintage theme at
| Bah! Humbug! - |
Labels:
ACY,
Bah Humbug,
christmas,
DC,
MS,
Winter Wonderland
Saturday, March 13, 2010
3d candy box - Pot of Gold

I made two of these for the two woman at my post office who help me each week when I mail items.
They are so kind.

Filled with chocolates; Snickers, Milky-Way, and Twix
Labels:
3d,
ACY,
BLOG CANDY,
PDDU
Subscribe to:
Posts (Atom)


