Showing posts with label banner. Show all posts

Sunday, February 7, 2016

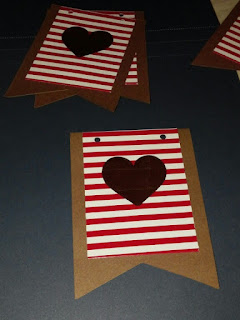
Hearts banner

When I saw these bags at Michael's I knew immediately I was going to make a quick banner.
I cut the flap off and they ended up being 3" x 4"
I then cut brown card stock to 3 1/2" x 4 1/2" and punched holes in the top layers with my Crop-a-Dial.
Add jute string and hung it to nails in the entry of my kitchen.
And still plenty bags left for other crafts and treats.

Friday, October 30, 2015

Farewell banner

With some old 8 1/2 x 11 pattern paper, twine and computer font I was able to quickly make this banner.
Cut the stack of paper with my old guillotine type cutter into 4 x 8 pieces to make each flag. Took the cut stack and placed them in the guillotine to cut the flag "V" out of the bottom.
Kept the stack together and with my Crop-a-dile punch holes an inch from the top edges.
To save time from dragging out my Cricut and finding which font I wanted...I used a Microsoft font at a font size of 88 so it could be seen. Printed it with enough space to be able to cut a border all around.
Glued each letter to solid cardstock and ran green twine through the holes. Quick and this may make me create others for different occasions!
 I placed the banner in 3 sections so he could see it walking up the stairs of my raised ranch.

Monday, August 31, 2015

Simple balloon birthday card

My nephew's second child had a first birthday party a couple weeks ago and I went to the outdoor event and made this card. I free handed the balloon and raised it on foam squares and tied some twine to it.
The sentiment is from Stampin up.

For the inside, I used the small tag punch and free wrote O N E on each tag and taped it to string.
 I also added glitter glue to the balloon and random areas of the sentiment.

Sunday, May 9, 2010

Summer Banner


Made this for my daughter - this is the last in a series of 4 banners I made her for her college room wall.


All cuts were from Doodlecharms Cricut cartridge at 2 1/2"
SUMMER letters were cut from Cuttin' Up at 1 3/4"

Friday, February 26, 2010

SPRING banner

Far away view! LOL click pic hope it's closer

(had to split pic so you could see it)

This is the third one in a series of 4 wall hangings for my daughter's dorm room.

Cuts are as follows:
"S" Umbrella from Designer Calendar Cricut cartridge that I won from Cuttlebug Challenges cut at 2". The rain is liquid pearls
"P" Shamrocks are from Designer Calendar cut at 2" and 1", inked and raised with foam tape
"R" Dragonfly from Doodlecharms Cricut cartridge cut at 2", blue Stickles used on the wings and the flight pattern is gold glitter glue
"I" are bunnies from Doodlecharms Cut at 2" and 1 1/4"
"N" The gorgeous eggs are cut from Designer Calendar at 1 1/2" and glitters with Martha Stewart glitter
"G" are Tuilps from Designer Calendar cut at 2" and 3/4" run through the Cuttlebug D'vine Swirls folder to emboss and also Stickled

The letters for S P R I N G were cut at 2" from Designer Calendar
Please click on the pictures to see a better view. TFL

Sunday, November 29, 2009

Winter Banner 2


I made this for my daughter's dorm room per her request as I had made a FALL banner back in September. So you will see SPRING and SUMMER accordingly as she would like a matching set.
W = Skating Children ACY key #28s at 3"
I = Snowflakes ACY Key 28 Icon at 2"
N = Trees DC Key # 44 border 2"
T = Penguin JOTS at 2" and 1 1/2"
E = Snowman DC Key #1 at 3"
R = Sleigh JOTS Key 13 at 2"

Font cut at 2" from ACY Cricut cartridge

Winter Banner 1


I made this for our home (please click the picture to see a closer image)
The cuts are as follows using Cricut cartridges
W - 2 Turtle Doves - from JOTS cut at 2"
I - Border of Trees - from DC at 2"
N - Penguins - from JOTS cut at 2" and 1 1/2"
T - Snowflakes - 5 were made using Martha Stewart punch
E - Ornament - this was made using a Stampin' Up punch and silver ink was used
R - Santa and Child - ACY - 3"

Back ground paper from Hot off the Press

Saturday, September 26, 2009

BOO - a Banner


I created this banner for my home and my daughter's dorm.
Over at Die Cuts R Us Tuesday's Challenge #8 was to make something for Halloween.
And Over at Practical Scrappers you had to use die cuts - BOY did I - all of it is die cuts - lol - giggle. Check out the Challenge Blog Hop-Saturday and enter!
The letters were cut from Plantin Cricut cartridge at 4" multiple times
Other items all cut from Paper Dolls Dress up at 3" (love this cart!)
The patterned card stock is a new 8 x 8 pack at Michael's - I bought it last night with my 50% coupon. I was able to get 4 of each letter on one piece of card stock! PERFECT as I was making 4 of these banners.

I was asked about the card stock pack I bought at Michael's - here is a pic of the 8 x 8 stack.

Friday, September 11, 2009

FALL banner


I made this for my front door.

Card board from recycle soda box, images cut from Doodlecharms cricut cartridge at 2" and less.
F.A.L.L letters cut from Provo Craft alphabet Coluzzle.
Ink and pop dot throughout, twine to hold it all together.
I am enterring this in the A challenge at Challenge #2 Just Buggin' Challenge.

And also entering this in the ABC challenge at Paper Cutz Challenge # 8
You had to make something with A B and C. My A is acorn and apples. My B is this banner and basket, my C is the paper charms on the twine.