Saturday, January 31, 2009
Wild Card - Oval Card

First time making this card - seen a few folks on the MB and wanted to give it a try. Cut at 5", a liner of beige was also cut. Paper flower from Oriental Trading glued on Pearls added through out the swirls (pearls from Michaels).
7 - Birthday card

Made this for my nephew who will be 7 on Sunday. Happy Birthday Christopher!
Embossed the front with a Cuttlebug folder. Circle and SEVEN cut from Graphically speaking Cricut cartridge, Happy Birthday cutfrom Wild Card Cricut cartridge.
Cricut - Doily Card

Well - I had to try my hand at the doily card from the wild card cartridge. This was cut at 5", the top of the card was embosed with swiss dots from Cuttlebug. I added shiny rhinestones between the scallops.
I layered the inner panel pink. Cheers is also cut from WC at real size 1 1/2. Pearls are from Michaels and the silk flowers is from a yard sale.
Labels:
CB,
Doily card,
WC
Wednesday, January 28, 2009
Christmas Stampin' All Year Long - Challenge 1

Maria is doing a weekly card challenge on her BLOG http://christmasstampin.blogspot.com/
I decided to enter. Non traditional colors. MS snowflake punch, glittered. Stamps from Inkdinkado, cloth ribbon is from my stash (to mimick a scarf). You cannot see it - but I SIZZIX emboss the cream CS with snowmen.

Sunday, January 25, 2009
Pinwheel card

Wanted to try my hand at this card from the Wild Card cart
Not too bad and goes together quickly.
As you use the thumb wheel - it will relay the rest of my message.
"Hope your new semester goes well"
Card cut at 4 3/4" - sentiment real dial size at 1 1/2"
For You - Enjoy

This is a whimsy card... handmade the hotdog and french fries. For You cut from Wild Card cart, and ENJOY cut from Graphically Speaking. Arrows are from a SU punch.
Inside holds a gift certificate to a local diner.
Friday, January 23, 2009
Slider Card Just 4 U - gift card
Wednesday, January 21, 2009
Box - for flower jars from previous post
Baby Jar covered – repurpose to hold paper flowers


I received these gorgeous paper flowers yesterday. I bought them from http://www.orientaltrading.com/. Since they came jumbled in one clear square box (which I will repurpose later) I wanted to repurpose the baby food jars I had. (My DD had her wisdom teeth out and loves the banana fruit. LOL)
I separated the flowers into the 4 colors and put them all (that was fun – there was so many) in it’s own jar.
I cut a 1 x 7 ½ piece of coordinated paper or CS and glued it around the belly of the jar. The cover was also covered with a 1 ¾ circle and glue dot in place.
I am in the process of making a box to put them in and will store them on my shelf. I will post that when I have completed it.
Thank you Star card - diff version

I really like the star card on the wild card cartridge from Circut.
I made this card for my sister who is forever providing me with coupons. So I sent her a TY and some as well.
I took the cut out from the liner ... and placed it inside to write my sentiment on.
I also rounded the corners with a corner rounder punch.
Great card would work for a lot of occasions.
Birthday, cheerleader, star football player, graduation, or a thank you.
card keeper - recycle snack box
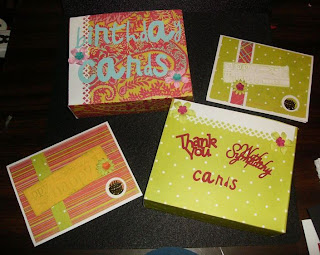
I needed some card keepers - to segregate all my cards that I make. While I saw quite a few how to's on SCS and you tube - as I was emptying a snack box, you know the ones with granola bars in them.. I thought why build one from scratch when I can cover the sturdy boxes, so I covered 4 - here are a couple shown here.

I will segregate the season, or theme in each box and store them on my shelf. I find they hold the standard A2 card and envie. Approx 8 - 10 depending on how much embelleshments you put on the card.
 Font on both boxes is from Wild Card cricut cartridge

I will segregate the season, or theme in each box and store them on my shelf. I find they hold the standard A2 card and envie. Approx 8 - 10 depending on how much embelleshments you put on the card.
 Font on both boxes is from Wild Card cricut cartridge
Valentine cards - wire, border punches, paper flowers
When I saw this wrapping paper (glitter red) at the grocery store - I thought it would make a great accent for a card. I also had bought a wire kit and never used it! So I tried my hand at making the filagree and the heart - so simple! The unit has pegs which you wrap the wire around to make the shapes. I used a small brad to hold it to the card. Love them - will have to do more with the wire. Hope you like.


Monday, January 19, 2009
Sunday, January 18, 2009
March Tissue Box Cover
February Tissue Box

Each Month I make Kristen a tissue box cover for her dorm boutique tissue box - to brighten her room.
Here is the one for February. I did two sides, as I am in the process of making the other two sides for March.... Off to cricut land.... to create and cut...
These two sides were used with the cuttings from the Wild Card cart! Love the swirls, I also chalked subtle hearts on the background first and added pearls to the hearts.


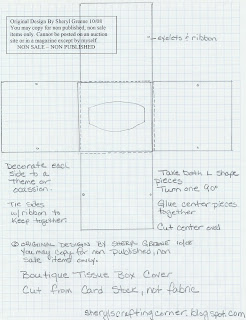
(FYI - the tissue cover is my own creation)
Subscribe to:
Comments (Atom)


